Monday, June 30, 2008

D.I.Y. WEDDING BLISS

This year, my husband and I will be celebrating our 22nd wedding anniversary. Time flies. We received many wedding cards from friends and relatives near and far to celebrate with us our special "I do" day. Vows made are meant to be kept in good times and bad times, in health and in sickness till death do we part. It's during those "bad" days that I take out all the cards to remind me of that one special day that meant so much to me. My dream came true and surely, other dreams can come true as well and they still do.

This is a pretty simple card to make. Get the papers and cardstock ready. If you have a printer at home you can go to www.papercraftinspirationsmagazine.co.uk for free download of fabulous pattern papers.

Roll out die cuts from Jeart 1401035 Frame#1/Goblet, 1202558 Love #2, Box 3-ornament#1 & 1202555 Flowers #8. I use embossed paper and foam for cut outs as well.

Cut out with Jeart 1401037 Tuxedo die shape and 1710037 Dress#4 and another for backing. The above ribbon is a sample of what I have used, you can pick your own choice of ribbons, they'll look equally pretty.
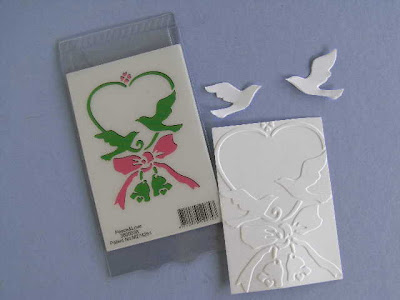
For the birds, I emboss with Jeart 3600038 Peace & Love embossing die and then cut out the birds. You can also cut out the ribbon for extra decoration.

Roll out the Jeart 1710008 Ring die shape and replace the paper jewelry with clear buttons instead. You can find these buttons at shops that sell tailoring materials.

The tuxedo and gown can be left as they are (refer to my other wedding card) or you can draw out faces and hair and body parts to create a full human figure. I hand drew a veil on tracing/vellum paper.

I use sticky foam for the 3-D look. Cut small pieces of the foam tape and stick all around cut outs. I do it with most of the cut outs.

Wrap the ribbon around the gown to give the gown a full dress look. Secure the back with double sticky tape.

Assemble and decorate the cut outs as you wish.

I arranged mine to look like this.

Wednesday, June 25, 2008

D.I.Y. FRIENDSHIP CARD


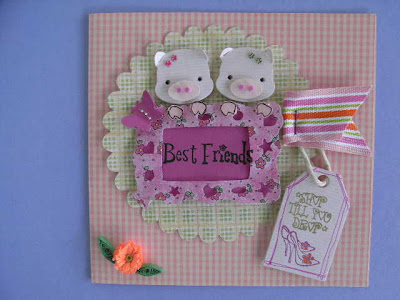
This is a fun and sweet card to make for friends or daughters or daughters-in-law :) to remind them how much they mean to us - they would even sacrifice their time to spend hours upon hours of window shopping with us!

You'll need papers, pattern and cardstock; die cut outs (I use Jeart 10000020-12 Dog# 1, 1701104-12 Gift Tag and 1710028 Square#1/butterfly frame); punches - oval and sakura flower for piggy's nose and feet; ribbon; gem sparkles in tear drop and flower shape (normally used for nail painting- I found these at hair accessories shop); colored pens; foam tape, double sticky tape, white craft glue and pointed toothpick for picking up teeny weeny bits.

Cut out shapes required with roller-cut machine. Optional: draw out shape and cut out.

I use an oval punch for piggy's nose. Optional: Draw an oval shape and cut out.

Sakura flower is excellent for piggy's feet. Outline with dark pen.

Assemble and use foam tape for 3-D effect. Glue gem sparkles onto butterfly, piggy's forehead, etc.

3-D effect. I use pink foam paper for piggy's dottie nose. They're cut out from the eyes of dog's die shape.

After decorating and assembling, glue the finished piece onto cardstock, use glue or double sticky tape.

Finish off with messages and other embellishments of your liking. I add quilled flower and leaves made from strips of colored papers.

Monday, June 23, 2008

D.I.Y. BIRTHDAY CARD WITH JEART SHAPE DIES

There are a couple of Jeart die shapes used to make this card.

Roll and cut out the dog die with different colored papers, depending on what color you want your dog to look like. Refer to blog archive under "Fan of dogs".

Cut outs of dogs.

Cut a backing for the dog body by cutting card paper around the dog shape.

For 3-D effect, cut small pieces of foam tape and stick around the die cut.

Stick backing on.

To give the dog's paw a two-colored tone, cut two pieces of different colors and glue one on top of the other.

Color the flap of the body which is used here for dog's tongue.

The pieces are now ready for assemble. You can play around to find your ideal dog.

A cheerful playful dog.

Dog with collar.

Cut out balloon with balloon die shape.

Stick tiny foam tapes for 3-D effect.
Stick a backing of different color to give two-color tone.

Cut out the card size with cardstock paper. Cut another of slightly smaller size and glue onto the card.

The card is ready to be decorated with embellishments.

Cut a tag out of tag die shape.

The finished card with stamped messages.

D.I.Y. CHRISTMAS CARD


Christmas card

You'll need pattern papers (don't have to follow exactly the same pattern here), solid colored paper as contrast (seen here in red), paints (acrylic or watercolor pencils or whatever you prefer to use), double sided sticky tape, foam tape and ribbon (any color). I use acrylic paint here.

Cut pattern papers to the size of the card you prefer. Mine's a rectangular shape.

Fold and crease thick card paper.
Color the cut outs. I use hollies and color the leaves green and berries red.

Make a backing for the pocket. Glue pattern paper over card paper.

Punch a semi circle in the middle of the pocket envelope. You can also draw a semi circle and cut with scissors.

Stick double sticky tape around the edge of pocket envelope to create a pocket.

Cut small pieces of foam tape and stick to embellishments to give the 3-D effect.

Decorate with ribbon.

Cut tiny piece of sticky tape to stick underside of ribbon bow to stick on paper.

Cut out a tag (of any shape you like ) to keep inside the pocket. Decorate as you wish.

I stamped mine with words and decorate with a small ribbon. You can handwrite messages if you don't have rubber stamps.

Finished card looks like this.